Red Hat Satellite useful links

This is a list of assorted links I found useful related to Red Hat Satellite and its vibrant ecosystem of community produced tools. I'll keep this page updated whenever I find anything interesting so keep visiting it :) .

Red Hat content

General content

Red Hat Knowledge base articles

Github projects

API usage and samples

Performance tuning

Happy reading ;-)

Red Hat Virtualization to get Hyperconvergence (HCI) support

It's been a while since I last touched Red Hat Virtualization (now without the 'E'!). Once thing that picked my eye in this review is the fact that Hyperconvergence is now a thing and will be supported very soon.

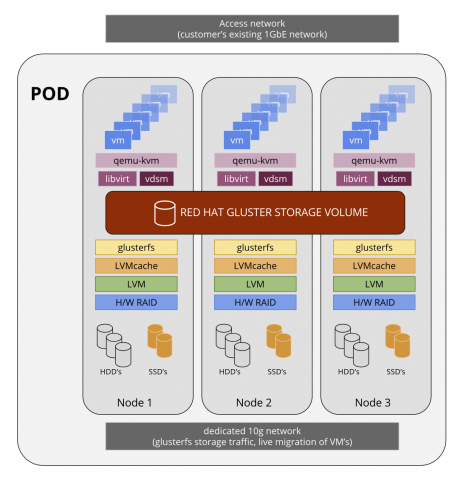
The idea behind this is providing ROBOs (remote offices / branch offices) a low-complexity solution to support their computing requirements without investing in difficult to manage technology. But enough with the buzzwords, the technical details are:

  • Virtualization technology provided by Red Hat Virtualization (RHV) 4.1 .
  • Software-defined Storage technology provided by GlusterFS .
  • Automathed installation via the Cockpit software.

RHV Pod components image

The plan is to support up to 3 pods (3, 6 and 9 hosts) configurations (remember this is a ROBO product). As with all beta software, this is subject to change in the final product so keep an eye on the Release Notes.

Here are a few links that will bring further info if this sounds interesting to you:

Happy hacking!

Introduction to hammer csv

Hammer CSV is an extension of the Satellite hammer administration tool, built by Thomas McKay. The main idea behind it was to generate machine-parsable export of different Satellite configurations that can be easily applied among Organizations of same/different Satellite servers.

What is developed so far is:

  • activation-keys
  • architectures
  • compute-profiles
  • compute-resources
  • containers
  • content-hosts
  • content-view-filters
  • content-views
  • domains
  • host-collections
  • host-groups
  • hosts
  • installation-media
  • job-templates
  • lifecycle-environments
  • locations
  • operating-systems
  • organizations
  • partition-tables
  • products
  • provisioning-templates
  • puppet-environments
  • puppet-facts
  • puppet-reports
  • reports
  • roles
  • settings
  • smart-proxies
  • subnets
  • subscriptions
  • sync-plans
  • users

And these are a few ideas of what can be done :

  • Export Content Views and Composite Content Views between Satellites, provided that you are using date-based CV filters.
  • Backup your settings to a git repo so you can understand when changes have been done.
  • Export your hosts/content-hosts to a list.

I put together a very simple export script that can be used to poke around what is actually being exported :

Update 2017-08-29: There is a very nice blog post by Rich Jerrido that covers advanced hammer csv usage and reporting of custom fields, available at: Subscription-manager for the former Red Hat Network User: Part 12 - Subscription Reporting Tools

Happy hacking!

LetsEncrypt for the lazy and/or extremely in a hurry

Quick note so I don't forget whenever I need to do this again :-) . Let's Encrypt is an incredible initiative to enhance the security of web users by issuing free TLS certificates to website owners.

Generating a certificate is as simple as using Certbot:

certbot certonly -w /var/www/html/frangarcia.me  \
  -d frangarcia.me -w /var/www/html/frangarcia.me  \
  -d www.frangarcia.me -w /var/www/html/frangarcia.me

That will generate your required certificate files in /etc/letsencrypt/live/frangarcia.me .

If you are using Apache, the virtual host configuration can be as simple as the one shown below. If you every worried about SNI or having multiple TLS certificates in the same IP/port combination, Apache 2.4 automatically handles that for you - provided you are using an SNI-compatible client.

<Virtualhost *:80>
    ServerName frangarcia.me
    ServerAlias www.frangarcia.me
    DocumentRoot /var/www/html/frangarcia.me
</Virtualhost>

<Virtualhost *:443>
    ServerName   frangarcia.me
    ServerAlias  www.frangarcia.me
    DocumentRoot /var/www/html/frangarcia.me

    ErrorLog    logs/frangarcia.me_error_log
    TransferLog logs/frangarcia.me_ssl_access_log
    CustomLog   logs/frangarcia.me_ssl_request_log "%t %h %{SSL_PROTOCOL}x %{SSL_CIPHER}x \"%r\" %b"

    LogLevel warn
    SSLEngine on
    SSLProtocol all -SSLv2 -SSLv3
    SSLCipherSuite HIGH:MEDIUM:!aNULL:!MD5
    SSLCertificateFile /etc/letsencrypt/live/frangarcia.me/cert.pem
    SSLCertificateKeyFile /etc/letsencrypt/live/frangarcia.me/privkey.pem
    BrowserMatch "MSIE [2-5]" nokeepalive ssl-unclean-shutdown downgrade-1.0 force-response-1.0
</Virtualhost>

It's one of those things I wish I'd done a long time ago ;-) . By the way, do not forget to run your domain via the great SSLLabs utility to check your SSL config, you'll find minor issues for sure.

Happy hacking!

New life, new blog!

I was meaning to do this for a long time, but now it seems that I managed to get it done. I've now migrated my blog from Wordpress to Nikola - and while I'm on it, I've decided to start blogging in English ;-)

The migration itself is still a work in progress but the old content should be there. Nikola has an almost by-default configuration and will take some more time to get it finished but I guessed it'd be better to start small and make improvements than not migrating at all... so in the meantime please bear with me.

Also I've changed domains as well. My old bofh.es domain will be configured to redirect to the new one, frangarcia.me .

Happy hacking!

Camino al RHCA... y más allá

Por fin he recibido mi nota del último examen y finalmente... he aprobado, lo que significa que ya cumplo los requisitos para acceder a Red Hat Certified Architect. Por otra parte, debo ser de las pocas personas que, aprobando un examen EX300 de RHCE, le han dado una certificación de RHCA ;-)

Han sido unos cuantos años divertidos de andar haciendo exámenes y aprendiendo cosas, y me lo he pasado muy bien en este tiempo. La parte buena es que la diversión no se acaba y puedo continuar con el resto del programa RHCA y sus nuevas concentraciones (tracks) orientadas a datacenter y cloud.

¡Mola! :D

Camino al RHCA: RHEV (EX318)

Parecía un poco raro haber completado la certificación de Red Hat Openstack sin haber hecho antes la de su 'hermano pequeño', Red Hat Enterprise Virtualization (RHEV).

Así que me puse manos a la obra, y tras algunas peripecias de exámenes cancelados por parte de Red Hat, por fin pude presentarme al EX318. En mi caso hice la preparación usando el proyecto upstream, oVirt en su versión 3.5 .

Para montar un laboratorio medianamente útil, será necesario :

  • Una VM para montar un servidor IPA, DNS, NTP (1CPU, 1GB RAM)
  • Una VM para montar un servidor RHEV/oVrt (2CPU, 4-8 GB RAM)
  • Hosts en los que desplegar las máquinas virtuales. Si eres amante de las aventuras, se pueden instalar mediante virtualización anidada (nested virtualization), tanto en KVM como en Vmware vSphere.
  • (Opcional) Una VM para hacer de servidor de almacenamiento NFS & iSCSI.

Como siempre, en la web de Red Hat tenemos disponibles los objetivos del examen.

De cara al examen es muy importante tener encuenta el tiempo asignado a cada ejercicio y no pararse en exceso en una parte concreta si no sale a la primera.

Happy hacking :-)

Actualizar herramientas de HP con VUM

Después de muchos años administrando ESXi sobre servidores HP, nos hemos dado cuenta de un pequeño truco que permite actualizar de forma mucho más fácil las herramientas para administrarlos y monitorizarlos correctamente.

Basta con añadir la siguiente URL como origen de parches en la configuración de VMware Update Manager (VUM) para que todas las actualizaciones de paquetes se instalen al mismo tiempo que el resto de parches del hipervisor. Del mismo modo, esto sirve para

La URL a añadir es:

http://vibsdepot.hpe.com/index.xml

Es muy importante acordarse de que es index.XML ; si no, la descarga de actualizaciones no funcionará.

Igualmente hay un documento bastante interesante que describe algunas opciones más, incluyo una copia local (que ya sabemos cómo de fácil y buena es la web de HP).

Happy hacking!

Máquina del tiempo con btrfs y snapper

Llevaba bastante tiempo buscando un método "más rápido" de poder realizar mis copias de seguridad. Aunque sigo usando el método que mencionaba en artículos anteriores de hacer tars con pigz, para las copias incrementales del día a día era matar moscas a cañonazos.

Así que nada, un día me compré un disco externo adicional y decidí poner en funcionamiento 3 cosas que tenía por probar:

  • Cifrado completo de disco/partición con LUKS.
  • El filesystem btrfs
  • Los checks de integridad de btrfs (scrub)
  • La compresión y los snapshots de btrfs

Estos son los resultados:

Después de particionar el disco, inicializarlo con LUKS y crear el filesystem btrfs, podemos ver la estructura con lsblk:

$ lsblk 
NAME                                          MAJ:MIN RM   SIZE RO TYPE  MOUNTPOINT
[...]
sdb                                             8:16   0   1.8T  0 disk  
├─sdb1                                          8:17   0     1T  0 part  /run/media/fran/wd20ntfs
└─sdb2                                          8:18   0 837.6G  0 part  
  └─luks-0aad2fa7-f2c9-4acb-81f5-xxxxxxxxxxxx 253:5    0 837.6G  0 crypt /run/media/fran/wd20brtfs

Con btrfs obtenemos algo más de información sobre el filesytem:

$ sudo btrfs subvolume list -puta /run/media/fran/wd20btrfs/ 
ID      gen     parent  top level       uuid    path
--      ---     ------  ---------       ----    ----
257     944     5       5               75a8331b-9cd3-0d46-b773-9aaba88b6369    root
514     950     5       5               c767358c-83e0-134f-9698-2ae535742284    backup
556     951     514     514             54f942af-31e7-6e4c-ae4a-691d4642ddfd    <FS_TREE>/backup/.snapshots
558     828     556     556             add72c57-3f1b-a143-8902-cc0242e971bf    <FS_TREE>/backup/.snapshots/2/snapshot
559     841     556     556             9e6e71aa-8ddc-ee44-a0cc-628ab659c544    <FS_TREE>/backup/.snapshots/3/snapshot
560     848     556     556             fc44d63a-393d-294e-b868-6d12c9e5515f    <FS_TREE>/backup/.snapshots/4/snapshot

snapper es una herramienta desarrollada por SUSE que permite automatizar la creación de snapshots btrfs. Originalmente estaba pensada para dar la característica de rollback en caso de querer dar marcha atrás una actualización del sistema, pero es suficientemente potente para poder encargarse también de otros discos de datos.

$ sudo btrfs subvolume show /run/media/fran/wd20btrfs/                                                   
/run/media/fran/wd20btrfs is btrfs root

$ sudo btrfs subvolume show /run/media/fran/wd20btrfs/backup/
/run/media/fran/wd20btrfs/backup
    Name:                   backup
    uuid:                   c767358c-83e0-134f-9698-2ae535742284
    Parent uuid:            -
    Creation time:          2015-01-20 22:03:20
    Object ID:              514
    Generation (Gen):       950
    Gen at creation:        202
    Parent:                 5
    Top Level:              5
    Flags:                  -
    Snapshot(s):
                            .snapshots/2/snapshot
                            .snapshots/3/snapshot
                            .snapshots/4/snapshot
                            .snapshots/5/snapshot

$ btrfs filesystem df /run/media/fran/wd20btrfs
Data, single: total=119.01GiB, used=118.45GiB
System, DUP: total=8.00MiB, used=32.00KiB
System, single: total=4.00MiB, used=0.00B
Metadata, DUP: total=2.50GiB, used=1.70GiB
Metadata, single: total=8.00MiB, used=0.00B
GlobalReserve, single: total=512.00MiB, used=0.00B

$ sudo btrfs scrub status -d /run/media/fran/wd20btrfs/
scrub status for 7bb1d318-c7a9-40d8-995a-972a9d43544f
scrub device /dev/mapper/luks-0aad2fa7-f2c9-4acb-81f5-5197751fee3e (id 1) status
scrub started at Fri Apr 17 21:48:08 2015, running for 25 seconds
total bytes scrubbed: 847.03MiB with 0 errors

$ sudo btrfs scrub status -d /run/media/fran/wd20btrfs/
scrub status for 7bb1d318-c7a9-40d8-995a-972a9d43544f
scrub device /dev/mapper/luks-0aad2fa7-f2c9-4acb-81f5-5197751fee3e (id 1) history
scrub started at Fri Apr 17 21:48:08 2015 and finished after 3460 seconds
total bytes scrubbed: 121.84GiB with 0 errors

$ sudo btrfs prop list /run/media/fran/wdbuttercrypt/                                                        
ro                  Set/get read-only flag of subvolume.
label               Set/get label of device.
compression         Set/get compression for a file or directory

$ sudo btrfs prop get /run/media/fran/wdbuttercrypt/                                                         
ro=false
label=wdbuttercrypt

$ sudo btrfs prop get /run/media/fran/wdbuttercrypt/backupdedup/                                             
ro=false
compression=zlib

La configuración de snapper es, en principio, bastante sencilla.

#> snapper create-config  -f btrfs -t root /run/media/fran/wd15btrfs
#> snapper list-configs
Config | Subvolume                
-------+--------------------------
root   | /run/media/fran/wd15btrfs

jnuc /etc/snapper/configs #> snapper list
Type   | # | Pre # | Date | User | Cleanup | Description | Userdata
-------+---+-------+------+------+---------+-------------+---------
single | 0 |       |      | root |         | current     |

jnuc /etc/snapper/configs #> snapper create

jnuc /etc/snapper/configs #> snapper list
Type   | # | Pre # | Date                     | User | Cleanup | Description | Userdata
-------+---+-------+--------------------------+------+---------+-------------+---------
single | 0 |       |                          | root |         | current     |         
single | 1 |       | Wed Sep 23 13:37:16 2015 | root |         |             |

# btrfs subvol list -puta /run/media/fran/wd15btrfs
ID      gen     parent  top level       uuid    path
--      ---     ------  ---------       ----    ----
257     135     5       5               afb541bd-5459-e245-84af-eca6c17c1eaf    backupdedup
379     124     5       5               49b14378-0390-cf48-a81e-08a84b8b88a5    .snapshots
380     123     379     379             b1650ae6-4baf-e744-8b3a-26f4d5dd6fb9    <FS_TREE>/.snapshots/1/snapshot

Con esto vemos como crear nuestro primer filesystem que será controlado por snapper. Ahora solo es cuestión de invocar snapper create cada vez que vayamos a hacer cambios significativos en el filesystem, o queramos tener un punto de restauración en ese momento.

Snapper tambien nos permite hacer cosas muy interesantes, como por ejemplo controlar las diferencias que hay entre dos snapshots creados anteriormente:

snapper status 0..1

Happy hacking :)

Introducción a btrfs

Butter Filesystem, o btrfs, es un "nuevo" filesystem que toma bastantes ideas de ZFS de Solaris. Su idea fundamental es unificar la gestión de ficheros y de volúmenes (tipo LVM) bajo un mismo entorno. De esta forma, operaciones como añadir o quitar discos en caliente, redistribuir los datos (balance) o cambiar el nivel de protección (RAID) son factibles y mucho más eficientes al conocer qué ficheros están involucrados en cada operación (y no simplemente unos bloques que desconocemos si contienen datos o no).

Teniendo ya creado un filesystem btrfs, podemos empezar a sacar algo de información de esta forma:

$ df -ht btrfs
Filesystem      Size  Used Avail Use% Mounted on
/dev/dm-5       838G  123G  715G  15% /run/media/fran/wd20btrfs

$ sudo btrfs filesystem show /run/media/fran/wd20btrfs/
Label: 'wd20btrfs'  uuid: 7bb1d318-c7a9-40d8-995a-972a9d43544f
    Total devices 1 FS bytes used 120.15GiB
    devid    1 size 837.59GiB used 124.04GiB path /dev/mapper/luks-0aad2fa7-f2c9-4acb-81f5-5197751fee3e

Btrfs v3.18.1

Dentro de btrfs existe el concepto de subvolúmenes, que vendrían a ser similares a los filesystems zfs. Los subvolúmenes tienen una estructura jerárquica y pueden ser susceptibles de hacer snapshots con ellos, enviarlos con btrfs send/receive, etc.

$ sudo btrfs subvolume list -puta /run/media/fran/wd20btrfs/ 
ID      gen     parent  top level       uuid    path
--      ---     ------  ---------       ----    ----
257     944     5       5               75a8331b-9cd3-0d46-b773-9aaba88b6369    root
514     950     5       5               c767358c-83e0-134f-9698-2ae535742284    backup
556     951     514     514             54f942af-31e7-6e4c-ae4a-691d4642ddfd    <FS_TREE>/backup/.snapshots
558     828     556     556             add72c57-3f1b-a143-8902-cc0242e971bf    <FS_TREE>/backup/.snapshots/2/snapshot
559     841     556     556             9e6e71aa-8ddc-ee44-a0cc-628ab659c544    <FS_TREE>/backup/.snapshots/3/snapshot
560     848     556     556             fc44d63a-393d-294e-b868-6d12c9e5515f    <FS_TREE>/backup/.snapshots/4/snapshot

$ sudo btrfs subvolume show /run/media/fran/wd20btrfs/                                                   
/run/media/fran/wd20btrfs is btrfs root

$ sudo btrfs subvolume show /run/media/fran/wd20btrfs/backup/
/run/media/fran/wd20btrfs/backup
    Name:                   backup
    uuid:                   c767358c-83e0-134f-9698-2ae535742284
    Parent uuid:            -
    Creation time:          2015-01-20 22:03:20
    Object ID:              514
    Generation (Gen):       950
    Gen at creation:        202
    Parent:                 5
    Top Level:              5
    Flags:                  -
    Snapshot(s):
                            .snapshots/2/snapshot
                            .snapshots/3/snapshot
                            .snapshots/4/snapshot
                            .snapshots/5/snapshot

Al igual que en ZFS, las herramientas df y du no necesariamente muestran información correcta sobre nuestro filesystem. Factores como la compresión, nivel de RAID, etc harán que no concuerden estas informaciones con el uso real de espacio en disco y sobre la cantidad de información que este contiene.

En el ejemplo de abajo, podemos ver que hay 119.01 GiB de datos, pero solo ocupan en disco 118.45.

$ btrfs filesystem df /run/media/fran/wd20btrfs
Data, single: total=119.01GiB, used=118.45GiB
System, DUP: total=8.00MiB, used=32.00KiB
System, single: total=4.00MiB, used=0.00B
Metadata, DUP: total=2.50GiB, used=1.70GiB
Metadata, single: total=8.00MiB, used=0.00B
GlobalReserve, single: total=512.00MiB, used=0.00B

Cada subvolumen de btrfs puede tener distintas propiedades establecidas, fundamentalmente ro para cambiar un filesystem a sólo-lectura, y compression para establecer el algoritmo de compresión a utilizar para nuevos datos escritos en el subvolumen:

$ sudo btrfs prop list /run/media/fran/wd20btrfs/                                                        
ro                  Set/get read-only flag of subvolume.
label               Set/get label of device.
compression         Set/get compression for a file or directory

$ sudo btrfs prop get /run/media/fran/wd20btrfs/                                                         
ro=false
label=wd20btrfs

$ sudo btrfs prop get /run/media/fran/wd20btrfs/backup/                                             
ro=false
compression=zlib

Otra de las características que tiene btrfs es que podemos comprobar la integridad de nuestros datos. No nos servirá para arreglar nada si no tenemos otra copia de los mismos (bien por RAID, o de un backup externo), pero al menos nos enteraremos si nuestros datos están bien.

$ sudo btrfs scrub status -d /run/media/fran/wd20btrfs/
scrub status for 7bb1d318-c7a9-40d8-995a-972a9d43544f
scrub device /dev/mapper/luks-0aad2fa7-f2c9-4acb-81f5-5197751fee3e (id 1) status
scrub started at Fri Apr 17 21:48:08 2015, running for 25 seconds
total bytes scrubbed: 847.03MiB with 0 errors

$ sudo btrfs scrub status -d /run/media/fran/wd20btrfs/
scrub status for 7bb1d318-c7a9-40d8-995a-972a9d43544f
scrub device /dev/mapper/luks-0aad2fa7-f2c9-4acb-81f5-5197751fee3e (id 1) history
scrub started at Fri Apr 17 21:48:08 2015 and finished after 3460 seconds
total bytes scrubbed: 121.84GiB with 0 errors

Por lo visto anteriormente, btrfs es un sistema de ficheros prometedor y llamado a reemplazar a filesystems más tradicionales como ext4 ó XFS, a la vez que sistemas de volúmenes como LVM. Ahora sólo hace falta que gane algo más de soporte por parte de la comunidad y usuarios que lo prueben hasta el límite.

Happy Hacking :-)